
 Verify
your license for box products.
Verify
your license for box products.
Follow the steps below to verify that your site is licensed for Box products.
For information on obtaining a license for box product creation, please contact your sales representative, call (412)-785-1699, or complete the Web form at https://epssw.com/contact-us.php.
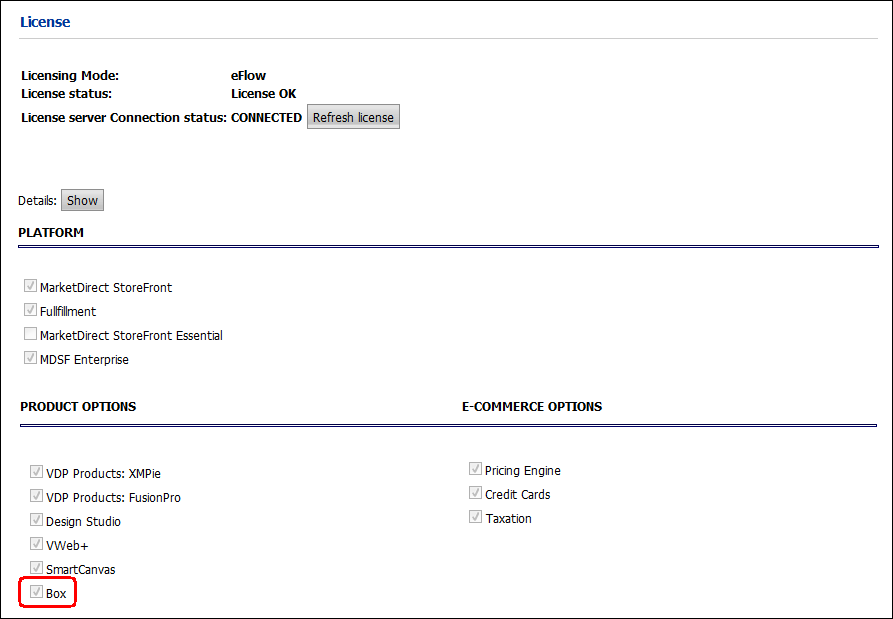
1 From the Administration home page, select License.
2 On the License page, scroll down to the Product Options section and verify that the Box option is selected.
Set
up your site for box products
1 Go to Administration > Site Settings.
2 On the Basic Settings tab, the fields in the Box Configurations section will be pre-populated:
● API URL
● API KEY
3 In the Additional content files for Box section and specify the file formats you will support for box products:

The file types you specify in this section will apply across the entire instance of MarketDirect StoreFront and cannot be overridden at the company or entity level.
● CAD: Computer Aided Design format used by AutoCAD.
We recommend enabling the CAD option so users can specify precise sizes when designing their box products.
● DXF: Drawing Exchange Format (i.e., typically used to enable AutoCAD to exchange data with other programs).
● EPS: Encapsulated PostScript format (e.g., vector image format generated and used in Adobe Illustrator and other vector image design applications).
● HPGL: Hewlett Packard Graphics Language format (e.g., the file extension used by plotter printers).
● DDES3: Diecutting Data format for exchange; this is a cutting table format with diecutting information.
Note on Additional Content Files
for Box Products
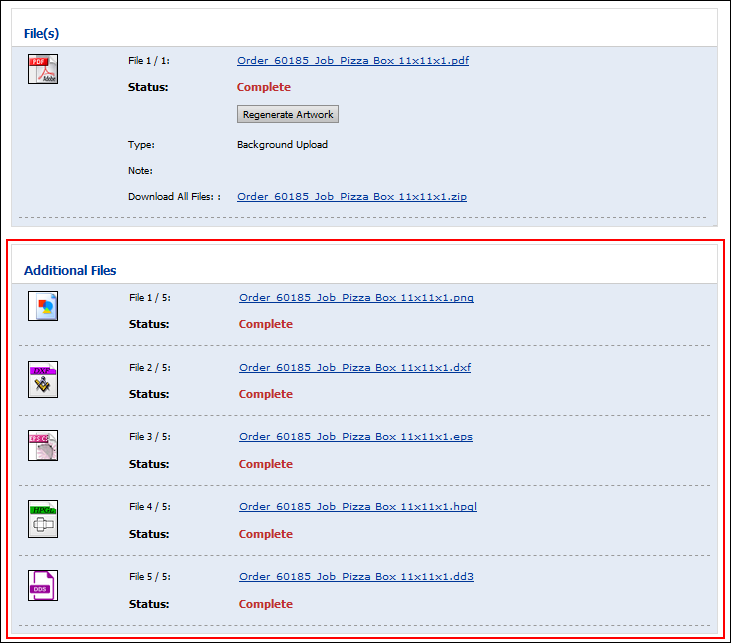
The content files you select in this section will be available
for download in the Additional Files section of the production
job ticket for each ordered box product (as shown below).
Please note that only the production PDF file will be sent to Fiery/JDF.
Additional content files are not sent to Fiery/JDF. The production
file will contain different layers for Cut, Crease, and Graphics
(Cut and Crease are defined in Spot Color).
4 Click Save Changes.
Create a box product
1 From the Administration home page, select Products.
2 On the Manage Products page, click Create Product.
3 In the Product Name field, specify a name for your product.
4 From the Type pull-down list, select Box.
5 Click Next.
- Configure
fields on the Progress Information | “Information” page
1 Product Name—Name of the product for administrative purposes. It can be the same as the displayed name. The product name can include up to 50 characters.
Warning: Product names cannot include the characters &# together because that is the HTML code for the fraction 1/4.
2 Display As—Can be a more buyer-friendly name of the product that will appear to buyers on the product pages on the storefront.
3 Product ID—Product code or SKU. The product name can include up to 50 characters. To take advantage of deep linking, be sure to use unique product IDs (SKUs).
4 Item Template: (MIS only) If applicable, enter the name of the MIS template to associate the product with. This will associate the product with a particular estimate in the MIS so the MIS knows which specifications should be used to produce the print job.
The system populates the Product ID field for fulfillment products sent from the MIS.
Box products are supported only by MISes that support printable products. For example, MDSF-Radius integration does not support printable product like Ad hoc, VDP, etc. so Box products are not supported for Radius MIS integration.
5 Description Footer Enter any additional information about the product. The footer will be shown on the storefront and in the product details.
6 Direct Product Link—A direct "deep link" to the product (the field will be visible only after you have entered a Product ID and saved the product).
See Product Deep Links in the Create New Product help topic.
7 Type—Display-only field shows the product type that you selected on the previous page.
● Associated Design: Click the link to associate a template with the box product.
● In the Designs window:
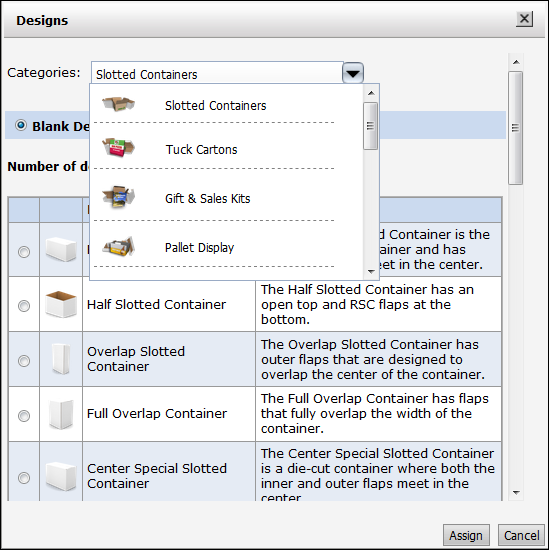
● Select the most appropriate category for the box product you are creating from the dozen or so available box Categories.
● Select an option for the design of your box product:
● Blank Designs: These are plain boxes that customers can either design or leave blank.
● Pre-Designs: These are box designs you have created on the Manage Box Pre-Designs page with custom images, logos, and other text. These pre-designs serve as templates buyers can customize to suit their needs.
For more information on creating box designs, see the section Design your box later in this help topic.
● Click Assign when you have selected the box design to associate with the product you are creating.
The description of the design you selected will be shown in the Associated Design field.
8 Brief Description—Enter descriptive text for the product that will be displayed to buyers on the storefront. This brief product description is augmented by a longer description that is displayed on an entire page when buyers click for more information on a product. There is a 2,000-character limit for HTML text.
HTML text characters add up quickly, so when possible keep formatting simple.
Most of the controls on the text editor will be familiar to users of word processing packages such as Microsoft Word or Corel WordPerfect.
9 Product Icon: The product icon is the image that will be used to represent the product on the storefront.
● Click Edit.
● None: Choose this option if you want no product image to appear on the storefront.
● Upload Custom Icon: Choose this option to select an image to display.
● Click Browse... and on the Choose File dialog navigate to the image file you want to display, select it, then click Open.
● Click Upload.
● Use same image for all icons: Choose this option only if you want to use the same image for all product icon thumbnails.
If you want separate images (e.g., of different sizes or content), do not select the option to Use same image for all icons. Note that the single image will not be scaled in the different places it is shown on the storefront.
If you have a landscape image to begin with, it may work well to select Use same image for all icons. If you have a portrait image, however, it is likely to be better to create separate images for the SmartStore storefront and for the product detail images.
- Configure
fields on the Progress Information | “Details” page
1 Long Description—Enter a detailed product description that will be displayed to buyers on the product details section on the storefront. There is a 4,000-character limit for HTML text.
2 Product Details Image—You can upload image(s) to represent the product to buyers when they are viewing the product details.
A maximum of five images can be uploaded for a product in the SmartStore 2.0. The SmartStore Builder can still only accommodate a single image per product.
Supported image file types include:
-bmp
-gif
-jpeg
-jpg
-pjpeg
-pngNone: Choose this option if you do not want a product image to appear on the storefront.
Upload Custom Icon: Choose this option to select an image to display for the product in the SmartStore Builder.
Click Browse..., select the image file you want to display, then click Open.
Click Upload.
Click the Delete button to delete the image file.
Upload Multiple Images: Choose this option to select image(s) to display for the product in the SmartStore 2.0.
Click Choose Files, select the image file(s) you want to display, then click Open.
The first image uploaded will be the first image that appears on the Product Details page. To change the order of the images, you will need to delete and re-upload the images in the desired order.
Click Upload.
Click the Delete button next to the appropriate image to delete the image file.
- Configure
fields on the Progress Information | “Settings” page
1 Display Priority—Select a priority for the product (within a category) from the pull-down list.
This will specify the order from top to bottom in which the product will be displayed on the storefront within a category, from Highest to Lowest; higher priority will cause the product to display higher within the category (if the product is published to a category) on the storefront product page. If two or more products have the same display priority, they will be sorted alphabetically.
2 Valid Dates
● Active: Specifies whether the product status is active (available now or, for instance, is created now to be made active at a later time, such as when a sales promotion begins).
● Start Date: Use the calendar tool to specify the date on which the product should start being displayed on the buyer storefront.
● End Date: Use the calendar tool to specify the date on which the product should no longer be displayed on the buyer storefront.
● Select Never if you do not want the product display to expire on a specified date.
3 Turn Around Time—If you want to specify a turnaround time for the product (when it will be prepared and ready for pick-up or delivery), type a number and time interval, else select None.
You can choose whether to show buyers the turnaround time for each product in an order in the Shopping Cart at the Print Shop (see Shopping Cart Settings for more information) or the Company level (see Shopping Cart Settings for more information).
4 Shipping Charges:
● Exempt Shipping Charges—No shipping calculations will be made on the product.
5 Tax:
● Exempt Taxes—No tax calculations will be made on the product.
6 Buyer Deliverable
You must select at least one buyer deliverable option.
● Print Only: This is the default and specifies that the product is delivered as a printed document.
● Print with Download Option: Selecting this option will make a digital download version of the product available to the buyer (as an option) at a specified price.
Offering a printed version plus a digital download version of a product
You can offer certain products to buyers in both printed and digital download formats (any product except non-printed, multi-record VDP, and ad hoc can be offered as a digital download file). Buyers can then choose to order the product in printed format only or in both printed and digital download formats. This gives buyers the option of ordering a production PDF version of a product (available for immediate download) in addition to the printed version of the product they are ordering. You can set any price you want for the digital download option.
Offering an optional digital download version of the production PDF file is a very attractive option for customers who, for example, want to order an initial lot of 250 copies of a VDP poster for a conference. Having the production PDF file on hand will enable them to print additional copies of the poster at the conference center if needed.The option to download the production PDF is for VDP, Box, and Static Document products.
Digital downloads of production PDFs are supported only on SmartStores, not on classic storefronts.
● Download Only: Selecting this option will make the product available to the buyer exclusively in downloadable format (i.e., a digital file buyers can download).
If you select the buyer deliverable Download Only, the only configuration available to buyers ordering the product will be the option to add tabs to the digital file. No other print or finishing options will be available for the download product.
7 Has product changed? (For products with Print and Download and/or Download Only buyer deliverables)
Check the box if the product has changed. This will prevent buyers from being presented with a reorder option (i.e., because the originally ordered version of the product is no longer available).● Download Period: Specifies how long the digital download version of the product will be available for download after the product is purchased.
● Enter a number in the text field.
● Specify the unit (Hour, Day, Year).
● File never expires: Select if you want to place no limit on the number of times the buyer can download the product.
● Number of Downloads: Specifies how many times the buyer can download the digital version of the product.
● Limited Downloading: Allow ... Times: Enter a number in the text box to limit the number of times the buyer can download the product.
● Unlimited Downloads: Select if you want to place no limit on the number of times the buyer can download the product.
8 N-Up—N-up stands for Number of pages up (2-up, 3-up, 4-up, etc.) printing. N-up printing is printing multiple buyer-submitted pages onto a single physical sheet and then cutting them to a specified finished size. For example, instead of using letter paper (8 1/2 by 11-inch paper), a job can be printed with a left-side page and a right-side page on tabloid (11 by 17-inch paper) and then cut down the middle with an industrial paper cutter.
N-up printing accommodates your production processes that print multiple pages on a single sheet then cut to final size (the “cut and stack” model). The savings can thus be passed on to the buyer as the MarketDirect StoreFront pricing engine will take into account the number of sheets and impressions involved in printing N-up. For example, say a buyer orders 400 copies of a 16-page document. Without N-up, the pricing would be calculated on 400 x 16 = 6,400 impressions and 400 x 16 (simplex sheets per job) = 6,400 sheets. But if the product is set up for 2-up printing, only 3,200 impressions and 3,200 sheets are used (i.e., the number of sheets and impressions is halved). The model indirectly correlates the product cost to your cost of production with N-up capabilities (e.g., where lower impression cost is passed on to the buyer).
N-up outputs the N-up information to Hagen, Logic, Pace, and the External System Connector (ESC).
-up should only be used for products that are very well-defined, i.e., those that have only one choice of Media size and a known finished size.
9 Manage Inventory
MarketDirect StoreFront provides a simple product quantity / reorder point to manage inventory of non-print-related (e.g., Non Printed, Static Document).
When MarketDirect StoreFront is integrated with an MIS, the MIS will handle inventory and communicate inventory information to MarketDirect StoreFront.
● Enabled: Enabling inventory management lets you manage non-printed and static document product inventory (e.g., finished goods).
● Inventory: Read-only field displays current inventory of the product. This field is not editable but for information purposes only.
An alert will display the current back ordered quantity if the product is back ordered.
● Threshold: Sets the reorder point (i.e., when inventory level reaches 10, send email notification to recipient specified below). This number must be smaller than the Inventory value you entered above.
● Allow Back Order: Check this box to enable processing of products that are on back order.
If you select this option, buyers will not be notified during order placement that the whole or a partial quantity of the order is back-ordered.
● Show Inventory when back order is allowed: Check this box to show the available inventory when you are allowing buyers to back order the product.
● Notification Email ID: Specifies recipients to be notified by email when the inventory threshold is reached. You can enter multiple recipient email addresses separated by a semi-colon ( ; ).
● Replenish inventory: These settings let you specify whether the replenished inventory includes the quantity required to fulfill back orders or not (e.g., the latter if back orders are handled outside of MarketDirect StoreFront such as in an MIS integrated environment in which the MIS handles inventory and communicate inventory information to MarketDirect StoreFront).
● Add ... to existing inventory: Selecting this option will cause the quantity you enter to be added to the inventory.
If you got a new set of items, simply enter the number received and we’ll add this amount to your inventory. If the product is back ordered, you will receive a message will be displayed that states: "This product is back ordered by [number]. It will be deducted from the replenished inventory."
● Reset inventory to ...: Selecting this option will reset the inventory to a completely new value; this only affects new orders placed after the reset operation. Using this option affects how existing orders are handled should they be cancelled; when canceling orders placed before the reset,non-backordered items will not be automatically replenished into the available inventory.
If the product is back ordered, a message will be displayed that states: "It is assumed that all pending orders for this product will be shipped without consuming this inventory."
10 Order Quantities—Specifies the quantities of the product buyers can order:
● Any quantity: Lets buyers order any quantity of the product.
● Fixed quantities: Specifies the fixed quantities of the product that buyers must order. For example, you might offer the product only in the fixed quantities 100, 200, and 300.
● Use the fixed quantity editing tools to set up your fixed quantities:

Lets you enter a fixed quantity in an entry box: . After entering a fixed quantity, click Update.

Removes the fixed quantity.

Adds another fixed quantity. Click to add an additional fixed quantity. Edit the quantity using the quantity editor if needed.
Example: If you set up the fixed quantities 100, 200, and 300, your fixed quantities will appear as follows:

This will present the buyer with a quantity pull-down list containing the options 100, 200, and 300 on the storefront.● Click Update.
● By Multiples:
● Allow buyer to edit quantity: Check this box to allow buyers to override the specified quantity for the product.
● Minimum: Specify the minimum number of the product that buyers must order.
● Maximum: Specify the maximum number of the product that buyers can order.
● Multiple: Specify the multiples in which the product must be ordered. For instance, you might only want to sell the product in sets of two, so you would set: Minimum = 2 and Multiple = 2, allowing buyers to order 2, 4, 6... of the product.
● Advanced: Enables you to specify a more complex quantity option, for instance to match a pricing structure for the product. This calls for using regular expressions. Enter the quantity pattern using regular expression (or regex) recipes.
For more information on regular expressions, see Regular Expressions.
Example: You want to let buyers order the following quantities of the product: 1, 2, 3, 4, 5, 10, 20, 50, 1000, 2000, 3000, 4000, 5000. So you want quantities for 1 to 5, then 10, 20 and 50, and finally 1000 to 4000 in steps of 1000. The Advanced quantity tool enables you to do this by entering the following rule in the entry box: 1..5-10|20|50|100-1000..4000[1000] which is a combination of three simple syntaxes.“1..5” is the Begin..End[Step] syntax, followed by “10|20|100” which is a Values syntax, followed by another Begin..End[Step] syntax.
This will present the buyer with a quantity pull-down list containing the options on the storefront.● Click Done.
● Maximum Order Qty Permitted: You can specify a maximum quantity of the product (up to 100,000) that can be ordered, which will be enforced in the cart.
Note that this field will be present only if you have selected the Any quantity option in the Order Quantities section above.
This field applies to SmartStores only (not classic storefronts).● Enforce Max Quantity Permitted In Cart: Select this option if you want the shopping cart to enforce the maximum quantity (i.e., permit passing orders with quantities that exceed the specified maximum).
● Multiple Recipients: This setting determines how the total quantity is distributed for split orders.
This setting will be available only if you selected one of the following order quantity options above: Fixed, Multiple, or Advanced.
● Each recipient set to a valid quantity: Choose this option if you want the minimum order quantity to apply to each recipient. For example, if the product has a minimum order quantity of 100, each recipient in a split order (one with multiple recipients) must be set to receive a minimum of 100 units of the product. Thus, this option enforces the minimum order quantity for each recipient in the order.
● Total quantity must add up to a valid quantity: Choose this option if you want to enforce the minimum order quantity only for the total order amount for a split order. For example, if the minimum order quantity for the product is 100, as long as the total units of the product shipped meets or exceeds the minimum quantity, all is well. Thus, for an order with two recipients, if recipient one receives 25 units of the product and recipient two receives 75 units of the product, the order will be acceptable because the minimum order quantity of 100 was met.
11 Production Notes—Enter any production notes for the operator who will produce the job. These notes will be displayed on the production job ticket when the product order is ready for production and on tickets sent to output devices.
12 Keywords—Enter any descriptive keywords that will help buyers searching for the product to find it.
Separate keywords with a comma ( , ), spaces are not necessary, and note that your total character count for keywords cannot exceed 500.
13 Shipping Subcontainer:
To use AuctionInc: If you use a subcontainer (a box that encloses the ordered material but is not necessarily the sturdy outer box used for shipping), specify the dimensions for a single box that will serve as the “subcontainer” and specify the maximum number of copies/quantity of this product that can fit inside it). For instance, say you ship business cards in a 7 x 3½ x 2 card box that you place in a larger box for shipping (the latter will vary based on the number of subcontainers are to be shipped in it).
If you do not use a subcontainer, enter the dimensions of the product itself and then set the quantity to 1.● Ship item separately: Check this option to prevent exceeding the maximum package weight.
This control is to help you prevent exceeding the maximum package weight for the product. If packing multiple subcontainers in the larger shipping container will exceed the maximum package weight, you should check the Ship item separately box to prevent exceeding the maximum package weight.
For example, say the product is a lamp that weighs 100 pounds. The maximum package weight for shipping is 150 pounds. You would want to ship each lamp separately to prevent exceeding the maximum weight (i.e., if you ship two in a single box, it would be 200 pounds). Thus the weight determines how many packages will be created.● Enter the dimensions of the sub-carton in which the product will be packed for shipping:
● Width of the subcontainer
● Length of the subcontainer
● Height of the subcontainer
● Max Quantity per Subcontainer: maximum number of items to include in each sub-container.
If you are not using a subcontainer, the information should reflect the dimensions of the shipping container to ship a single piece.
- Configure
fields on the Progress Information | “Pricing” page
Two pricing models are supported for Box products:
(1) product-level pricing (i.e., fixed price per unit); use this option if the box product has a fixed size.
(2) area-based pricing (calculated on the area and number of impressions); use this option if the box product does not have a fixed size but can vary based on buyer specifications.The impression types below are specific to box products because box substrates are not sheet, roll, or large format):
· Box / Black & White / Duplex
· Box / Black & White / Simplex
· Box / Color / Duplex
· Box / Color / Simplex
· Box / BW Front / Color Back
· Box / Color Front / BW Back
For more information on pricing products in MarketDirect StoreFront, see the “Pricing Overview” topic in the administrator online help.For products that allow buyers to download the production PDF, you must set a price value for the digital download.
1 From the View pull-down list, select which price sheet to display (i.e., the price sheet to associate with the delivery method you are creating).
2 In the dialog for the selected price sheet:
● Range Unit: Set the range break points for each price point (e.g., 1 - 50 might represent the quantity in the unit system in use on the site; for more information on the unit system, see Unit System). Use the button to add a range break point.
● Regular Price: Type the standard price for that range (e.g., 1 - 50 quantity might have a regular price of 10.00).
● Setup Price: Type the setup price for the range; the setup price will reflect your material and handling costs.
For more information on pricing, see Pricing Configuration.
- Configure
fields on the Progress Information | “Security” page
Assigning Ownership and Access Rights for the Product: In this section of the product builder you can assign an owner for the product and set permissions to restrict access to it. This enables you make the product available for editing and/or publishing by a particular user or group of users. The security option lets you assign management and publishing rights for a product:
· Publish: can publish the product for buyers on the storefront (this must be used in conjunction with Manage rights; i.e., in order to publish a product, which makes it available to buyers on the storefront, the user/s must also have Manage rights).
· Manage: can change a product by accessing it on the Products page and editing its specifications.
· Purchase: can manually specify purchase rights for the product to certain user groups.You can access the Modify Ownership & Permission page from the Manage Products page by clicking the security icon for the product in the Modify Security column.
1 Click Change to add or change who owns (is in charge of) the product.
● On the Select Owner dialog:
● In the first drop-down select the category of user to assign ownership of the product to: Users, Groups, Companies, or Departments.
Typically, this will be a user. The search field will help you locate the group or user you are looking for, and the Show field will limit the number of items displayed.
● Click the group or user to assign ownership to.
The function of “owner” is to ensure that someone can always get to the product (even if s/he does not otherwise have access rights). It exists in order to prevent a situation in which you would inadvertently configure yourself out of access to the product.
2 Click Add User, Group, Company, or Department.
● On the Select Security Principal... dialog:
● In the first drop-down select the category of user to whom to assign access to the product: Built-in Groups, Users, Groups, Companies, or Departments.
Typically, this will be a user or user group. The search field will help you locate the group or user you are looking for, and the Show field will limit the number of items displayed.
● Click the user or group to assign access to. The selected user or group will be shown on the Security page in the Access Permissions table. You can grant users the right to Publish and/or Manage (modify) the product.
You can retract access permissions at any time by clicking Remove for the user, group, or company in the Access Permissions table on the Security page.
3 Click Check Permissions For... and select the user, group, or company whose permissions you want to check. A new dialog will display the permissions for the selected entity.
4 Select Allow the purchase permission to be set to be manually managed for this product if you want to limit purchase rights to the product.
For example, you have a product that is in multiple categories with no category-level permissions set. You want a particular product to be available for purchase to members of company A but not to members of company B (but you want other products in the category to be available to members of both companies, A and B). Thus, you will use product-level purchase permissions instead of category-level purchase permissions.
● After you select this check box, a Purchase column is added to the Access Permissions table.
● Click Add User, Group, Company, or Department.
● On the Select Security Principal... dialog:
● In the first drop-down select the category of user to whom to assign access to the product: Built-in Groups, Users, Groups, Companies, or Departments.
Typically, this will be a user or user group. The search field will help you locate the group or user you are looking for, and the Show field will limit the number of items displayed.
● Click the user or group to assign access to. The selected user or group will be shown on the Security page in the Access Permissions table. Grant the selected user or group the right to Purchase the product.
You can retract access permissions at any time by clicking Remove for the user, group, or company in the Access Permissions table on the Security page.
5 In the Allow the products to always be searchable by the buyer, even when it is not published in a category field, select an option:
● Yes: Includes the product in user searches.
So, if the product name is "8-Page Booklet," it will show up in the search results when a buyer includes the term "booklet" in a search query.
● No: Excludes the product from user searches unless it is published in a category field.
● Use site-wide setting ([Yes or No]): Uses the default site-level setting for product searches.
You can change the site-level setting by clicking Default setting, which will open the Site Settings - Basic Settings tab in a separate browser window. The current default setting (Yes or No) is shown in parentheses.
- Configure
fields on the Progress Information | “Box Settings” page
1 Dimensions: You can select a standard size and/or a custom size for the box product.
A standard-size box is a one that has pre-determined fixed dimensions (such as a Pizza Box that is 10 inches long x 10 inches wide x 1 inch deep). You can define standard-size boxes on the Standard Size For Box page.
For details on how to add standard box sizes, see the section below Manage standard box sizes.
A custom-size box is one whose dimensions you can specify either as fixed (such as a box for specific product that is 26.6 inches long x 5.5 inches wide x 3 inches deep) or as configurable within a range that you set (in the Custom Size For Box section on the Box Settings page).
For example: You could set up your box product so that buyers could specify length, width, and depth (with ranges you set) to suit their needs. You could specify custom dimension ranges of 3–8 inches (length), 3–12 inches (width), and 2–6 inches (deep). This product will work well for the buyer who needs to source a package for a widget that is 5.5 inches long x 9 inches wide x 4.5 inches deep.● Standard Size For Box:
● Categories: Select the category of box and the standard size options for the box product.
You can select more than one standard size per product.
● Default: If you select more than one standard size, specify which one will be the default for buyers on your storefront.
● Allow Buyer to Enter Custom Sizes: Select this option if you want to enable buyers to specify custom dimensions when ordering the box product.
● Custom Size For Box: In this section you can define restrictions for buyer-defined custom box sizes.
● Units: Choose the unit of measure from the drop-down list.
Important: There are several options in the Units list, but the customer will only see the box measurements in the default unit for either Imperial or Metric measurements. The default unit for Imperial measurements is inches, and the default unit for Metric measurements is millimeters.
For example, if you create a product using centimeters as the unit of measure, the customer will see the measurement in millimeters.You can constrain any of the dimensions, or none of them. If you leave all fields in this section blank, buyers will be able to specify a box of any size (e.g., 400 inches x 32 inches x 19 inches).
For example, say you have customer who sells golf balls in 1-dozen, 2-dozen, and 3-dozen lots. You can create a box product with length fixed (either default of locked) at 7.5 inches and width fixed (either default of locked) at 5.5 inches but leave the depth variable (say in the range of 2 inches, to accommodate a single layer of 1 dozen golf balls, up to 10 inches, which could accommodate up to 5 layers of 1 dozen golf balls). If you left the depth value blank, it would be possible for a customer to specify a depth of 100 inches (for those 50-dozen golf ball packages), which may or may not suit your production capabilities.● Length: Specify the length range for custom-size boxes.
● Lowest: The shortest length buyers can specify.
● Highest: The longest length buyers can specify.
● Default: (Required) You must specify a default length for the box.
● Lock: Select Lock if you want to force the default value (i.e., not allow buyers to specify a custom length for the box).
● Width: Specify the width range for custom-size boxes.
● Lowest: The narrowest width buyers can specify.
● Highest: The widest width buyers can specify.
● Default: Specify a default width for the box.
● Lock: Select Lock if you want to force the default value (i.e., not allow buyers to specify a custom width for the box).
● Depth: Specify the depth range for custom-size boxes.
● Lowest: The shallowest depth buyers can specify.
● Highest: The deepest depth buyers can specify.
● Default: Specify a default depth for the box.
● Lock: Select Lock if you want to force the default value (i.e., not allow buyers to specify a custom depth for the box).
2 Editor Settings: Configure which editing controls to show or hide on the Box Editor that buyers will use when ordering the box product on the storefront.
You can also set Box Editor control settings at the site level, which is useful if you want the same Box Editor control configuration for most of your Box products. Then you can override the site-level settings as needed on a product-by-product basis with the product-level Editor Settings on the Box Settings page of the product builder.
To set Box Editor control settings at the site-level
1. From the Administration home page, select Site Settings.
2. Open the Product Type Settings tab.
3. In the Product Type field, select Box.
4. Configure the fields in the Box Settings as described in this section (i.e., the fields are the same in both Site Settings and on the Box Settings page of the product builder).
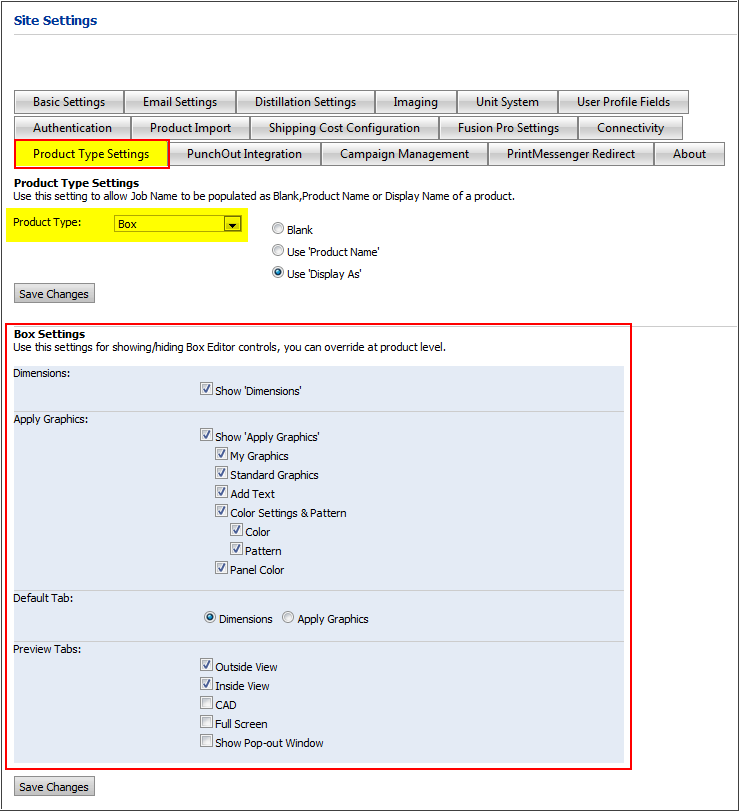
● Dimensions: This is the tab that lets buyers specify the finishing Media and size for the box.
● Show ‘Dimensions’: Select this option if you want the Dimensions tab to be shown to buyers.
● Apply Graphics: This is a tab on the Box Editor that lets buyers customize the box product with images, text, and color and pattern options.
● Show ‘Apply Graphics’: Select this option if you want the Apply Graphics tab to be shown to buyers.
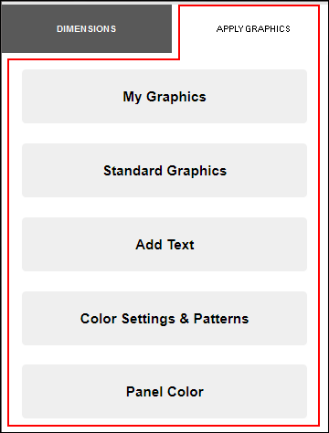
● My Graphics: This is where buyers can upload and apply their own images to the box design.
● Standard Graphics: This is where buyers can select and apply standard images to the box design.
● Add Text: This is where buyers can create, format, and add text to the box design.
● Color Settings & Pattern: This is where buyers can apply a solid color or a pattern to the interior and exterior of the box design.
● Color
● Pattern
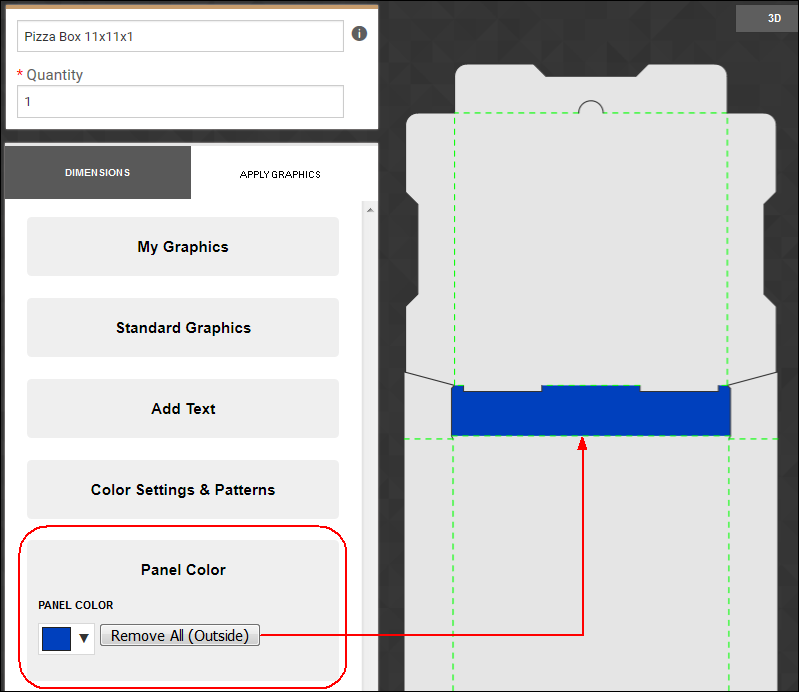
● Panel Color: This is where buyers can apply a solid color to one or more panels on the box.
● Default Tab: Select which tab below will be the default (i.e., the one that is open when buyers open the Box Editor).
● Dimensions
● Apply Graphics
● Preview Tabs: Select preview modes available to buyers as they are designing the box:
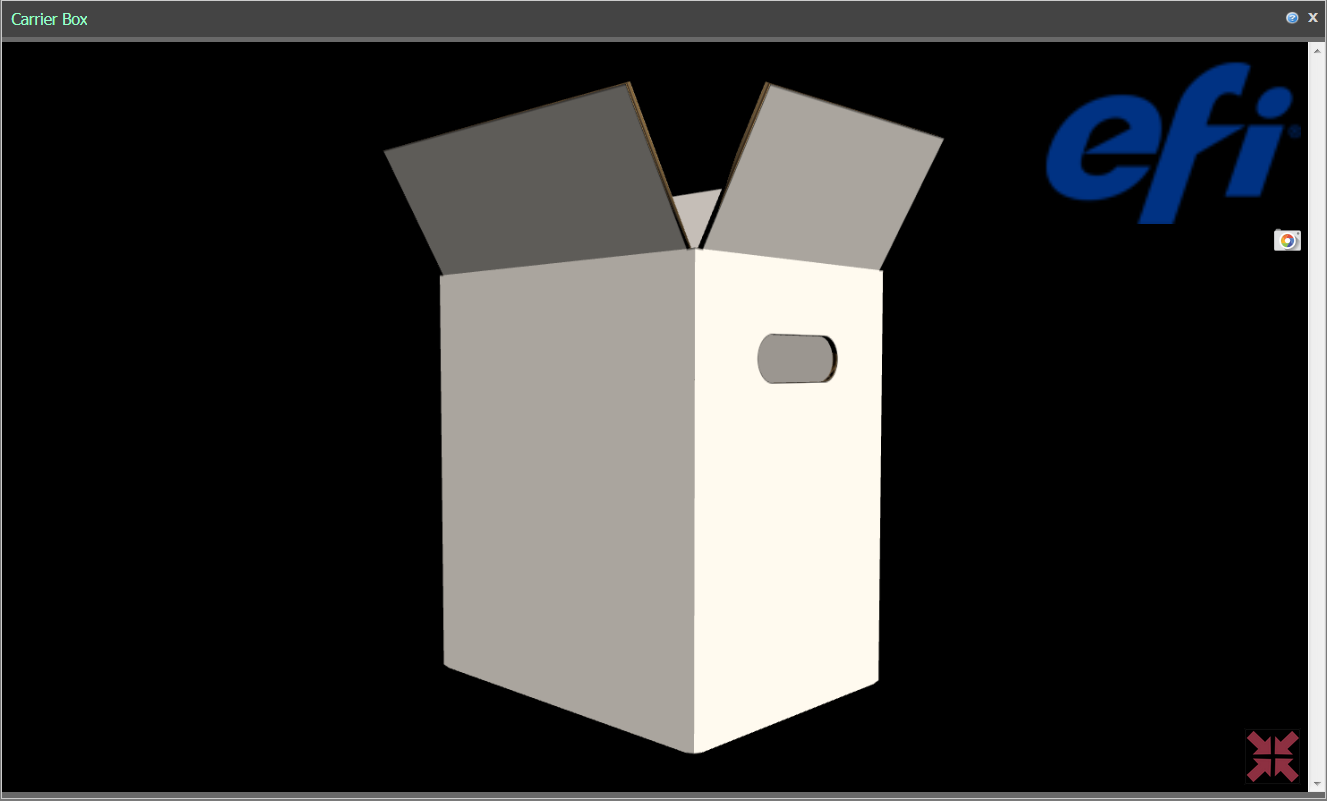
● 3D: A 3-dimensional representation of the box.
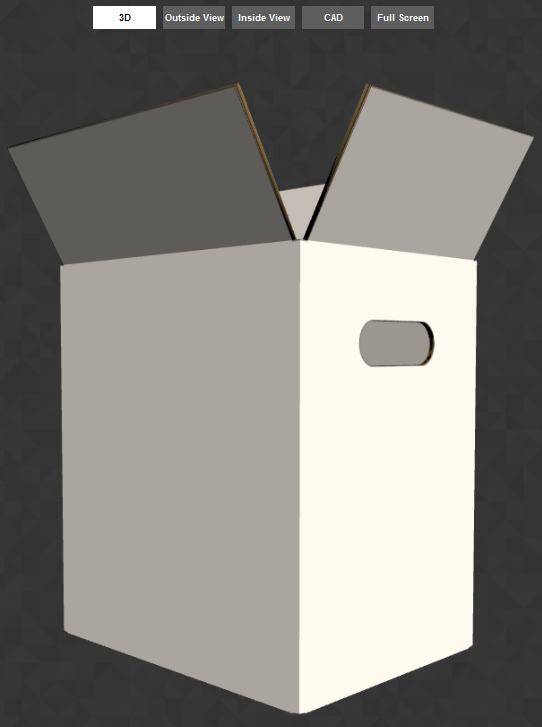
● Outside View: Depicts the outside of the box.
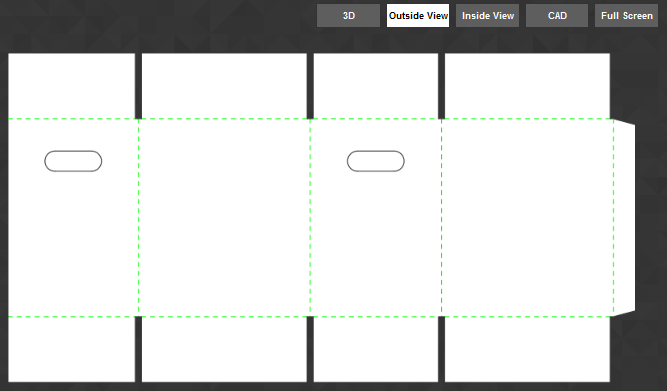
● Inside View: Depicts the inside of the box.
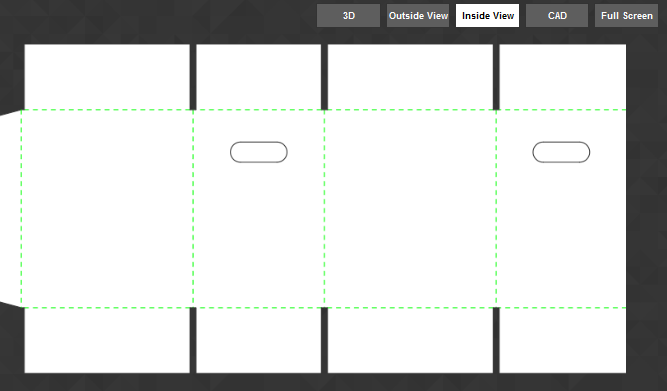
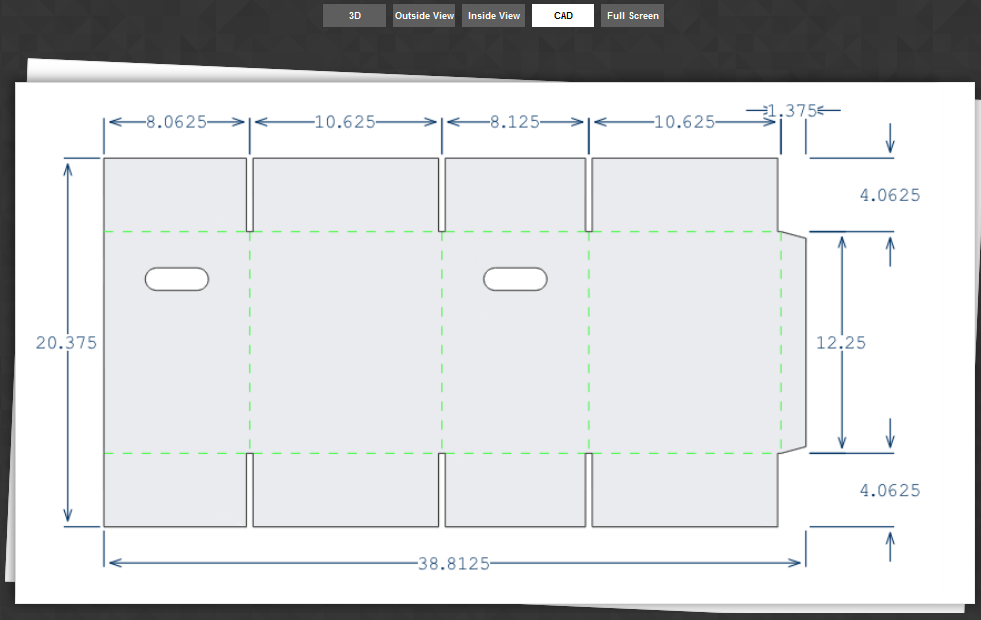
● CAD: Shows real-time CAD (computer-aided design) specs for the design.
The CAD image will reflect changes you make to the box dimensions.
● Full Screen: Shows a full-screen preview of the box design.
● Show Pop-out Window
- Configure
fields on the Choose Template page
● From the Ticket pull-down list, select the ticket template to associate with the product.
For information on how to create and edit ticket templates, see Ticket Templates.
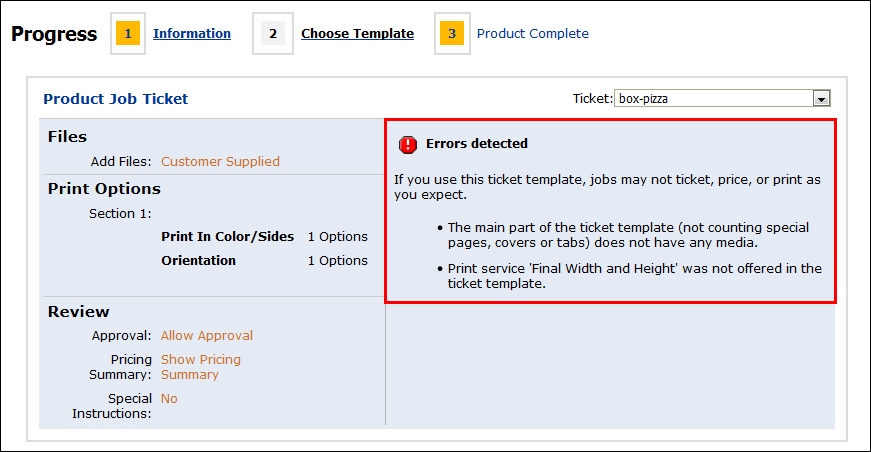
· No errors detected: The template-product compatibility checker did not detect any incompatibility.
· Errors detected: The template-product compatibility checker detected at least one compatibility issue that needs your attention.The template-product compatibility checker compares the product settings against the selected ticket template and alerts you to any incompatibility issues it detects.
Note that any ticket template you associate with a Box product will be checked and validated error-free only if it meets two criteria:
(1) It must contain Media that is mapped to at least one Board Type and one Box Finish Media characteristic
(2) It must contain the Final Width and Height print service
In the image below, the ticket template associated with the product fails validation because it does not contain (1) Media mapped to Board Types and Box Finish Media characteristics and (2) Final Width and Height print service.
The image below shows a template-product combination that passes the validation check:

For additional information on Media and box products, see the section Media & Box Products later in this help topic.
- Publish
the Box product on the Product Complete page
1 To publish the product to your storefront, click Publish It.
2 On the Select Target Category dialog, select the category in which to display the product to buyers on your Web storefront.
3 Click Publish.
4 If you have a license for product-level punchout (to allow buyers to "punch out" to your site from a procurement site (e.g., Ariba) and want to publish the product on the procurement site, click Publish to External Catalog.
5 Click Publish.
6 Click Finish.
7 Go to your buyer Storefront and review the product as it will appear to buyers. If changes need to be made, click Manage on the storefront and edit the product specifications.
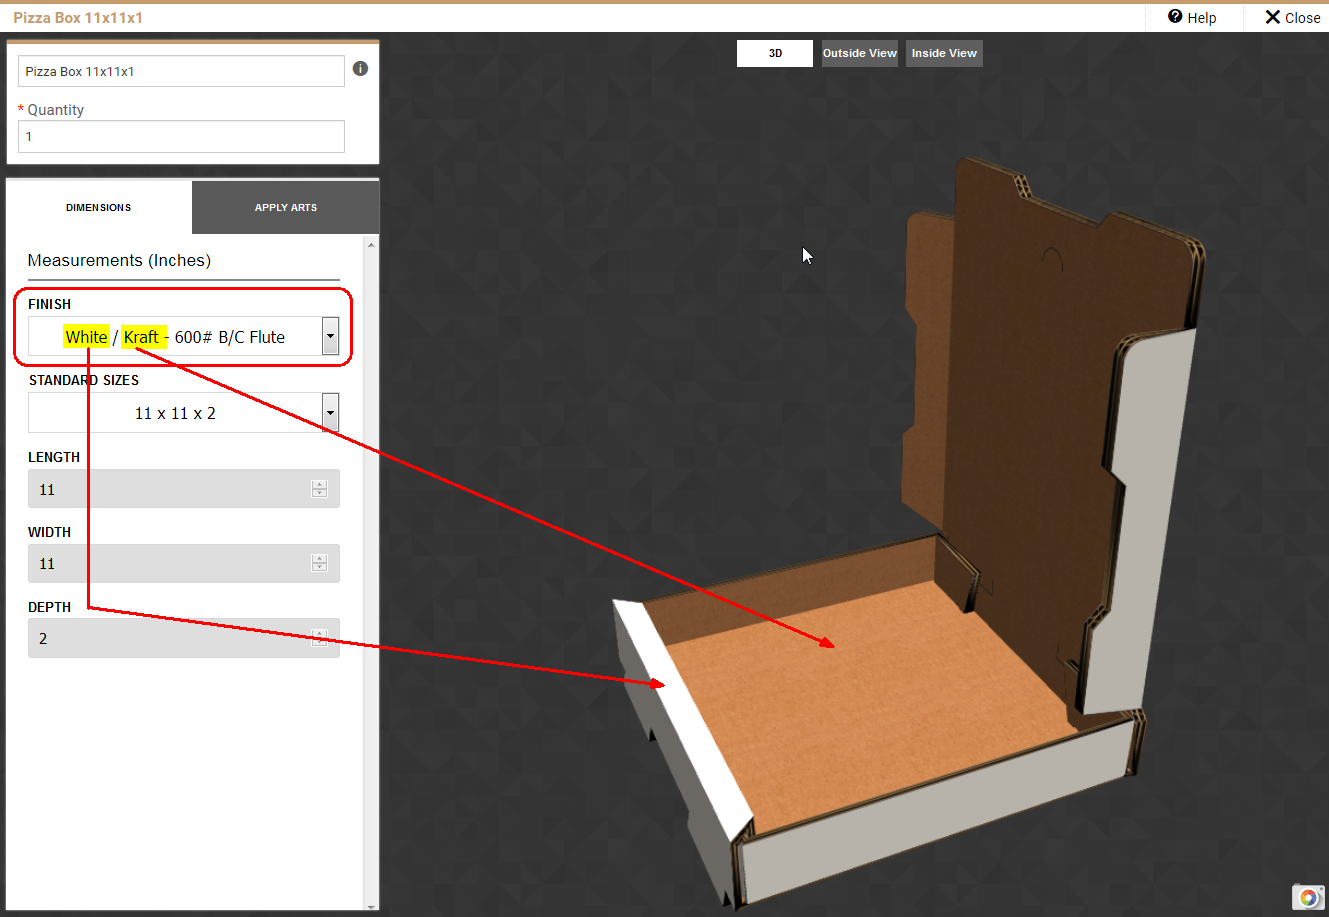
The image below shows a buyer-facing 3D preview of a box with Finish set to White (inside) over Kraft (outside) with required finished dimensions.
Manage
Box Pre-Designs
1 From the Administration home page, select Manage Box Pre-Designs.
The table on the Manage Box Pre-Designs page lists all your box pre-designs.
2 You can create, copy, delete, or edit a box design on this page.
- Create
a box design
You can create any number of box design products that your buyers can customize, e.g., by sizing to meet their needs and applying their own color choices, text, and images. The design you provide will serve as a starting point and is not a locked-down “static” design.
1 On the Manage Box Pre-Designs page, click Create Box Design.
2 Configure the fields in the Create Box Design window:

● Name: Specify a name for the box design.
● Description: Provide a useful description of the product (e.g., “Beverage Carrier–6 Bottles”).
● Categories: Select the most appropriate category for the design.
● Designs: Select the most appropriate design from the available options.
● Media: Select the most appropriate Media for the box.
3 Click Save and Continue to open the box designer and continue with the next section, Design Your Box
If you want to finish designing your box later, click Save & Exit.
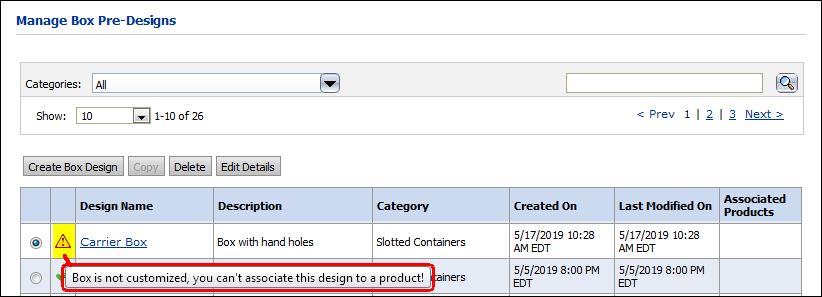
Note, however, that the design must be customized before you can associate it with a product. A design that has been created but not customized will be listed in the box design table on the Manage Box Pre-Designs page but will be marked with a warning icon:

- Design
the box
1 Select your preview mode from the options at the top of the design window:
You can change views at any time.
● 3D: A 3-dimensional animated representation of the box that you can manipulate to see how the box will appear from every perspective.
● Outside View: Depicts the outside of the box.
● Inside View: Depicts the inside of the box.
● CAD: Shows real-time CAD (computer-aided design) specs for the design.
The CAD image will reflect changes you make to the box dimensions.
● Full Screen: Shows a full-screen preview of the box design.
● Click the screenshot icon
 if you want to capture the current state of your design in
a screenshot.
if you want to capture the current state of your design in
a screenshot.● Click the resize icon
 to exit full-screen
mode.
to exit full-screen
mode.2 Design your box in the Apply Graphics tab: This is a tab on the Box Editor that lets buyers customize the box product with images, text, and color and pattern options.
● My Graphics: Select an image from the list (if you have added any custom images) or click Choose Graphic to select and upload an image or images to apply to your box design.
● Standard Graphics: Select standard images from the provided folders and apply them to your box design.
● Add Text: Create, format, and add text to your box design.
● Text: Enter the line of text you want to add.
● Font: Select the typeface to use.
● Color: Select the color for the text.
● Bold: Select if you want the text to be in bold face.
● Italic: Select if you want the text to be in italics.
● Color Settings & Pattern: Apply a solid color or a pattern to the interior and exterior of your box design.
● Color: Inside and Outside
● Pattern: Inside and Outside
The Show Scores option lets you see where the box will be scored for folding.
● Panel Color: Choose a color from the color selector and click to apply it one or more panels on the inside and outside of your box.
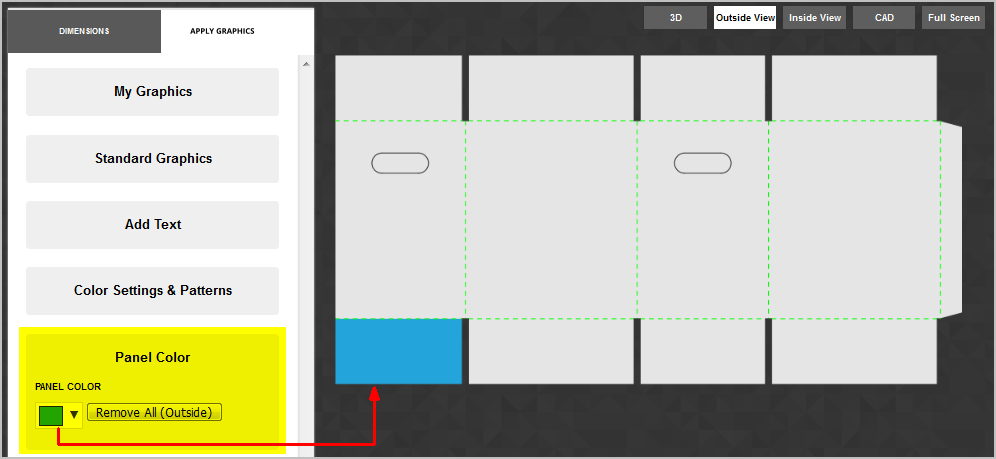
You will need to toggle between Outside View and Inside View modes to access the panels as needed.
You can use the Remove All (Outside) and Remove All (Inside) buttons to remove all color from the panels.You can select specify CMYK values as needed and specify whether to use standard black (K-Black that uses 100% K and 0% CMY) or rich black (Rich-Black that uses 90% K and 30% CMY).
3 Design your box in the Dimensions tab: This is where you specify the finish and dimensions of your box design.
● Finish: Select the finish (Media) for the box.
● Length: Specify the length of the box.
● Width: Specify the width of the box.
● Depth: Specify the depth of the box.
4 Click Save Design when your box design is complete.
The new box design will now be available for creating box products.
Copy
a box design
1 On the Manage Box Pre-Designs page, select the box design you want to copy.
2 Click Copy.
3 In the Create Box Design window:
● Give the new product a Name (until you do it will be the name of the copied product appended with _Copy).
● Provide a Description for the new product and select the appropriate Media for it.
4 Click Save and Continue to open the box designer and continue with the section Design Your Box.
If you want to finish designing your box
later, click Save & Exit.
Note, however, that the design must be customized before you can
associate it with a product. A design that has been created but
not customized will be listed in the box design table on the Manage
Box Pre-Designs page but will be marked with a warning icon:
Delete
a box design
1 On the Manage Box Pre-Designs page, select the box design you want to delete.
2 Click Delete.
3 Confirm your decision by clicking OK on the “Are you sure you want to delete selected design?” pop-up, or click Cancel to keep the design.
Edit
details of a box design
1 On the Manage Box Pre-Designs page, select the box design whose details you want to edit.
2 Click Edit Details.
3 In the Create Box Design window:
● Make any changes to the design’s Name, Description, and Media.
4 Click Save & Exit if you do not need to make any changes to the actual design; otherwise, click Save and Continue to open the box designer and continue with the section Design your box.
Manage
Box Standard Sizes
Create a new standard box size
1 Go to Administration > Manage Box Standard Sizes.

2 On the Standard Size For Box page, go to the Add Standard Size For Box section and configure the new standard box size with the fields below:
● Categories: Select the category for the new box size you are adding.
● Units: Choose the unit of measure for the box.
Important:
There are several options
in the Units list, but the customer will only
see the box measurements in the default unit for either Imperial
or Metric measurements. The default unit for Imperial measurements
is inches, and the default unit for Metric
measurements is millimeters.
For example, if you create a product using centimeters
as the unit of measure,
the customer will see the measurement in millimeters.
● Description: Provide a description to help buyers and product builders. For example, you can include a description containing its intended use (e.g., “Pizza Box”) followed by the dimensions of the box in the format [Length] x [Width] x [Depth].
● Length: Specify the length of the box.
● Width: Specify the width of the box.
● Depth: Specify the depth of the box.
3 Click Add.
The new standard box size will now be available to you for creating box products.
Edit a standard box size
1 Go to Administration > Manage Box Standard Sizes.
2 On the Standard Size For Box page, locate the standard box size you want to edit in the table.
3 Click Edit in the Edit column.
4 Change the Description, Length, Width, Depth, and Unit values as needed.
5 Click Update to save your changes.
To delete a standard box size, go to the target row and click Delete.
Learn
about Media
& Box Products
Various Media characteristics support Box products (in addition to the standard Media characteristics available for all products, i.e., Hole pattern, Sizes, Types, Weight).
● Color (finish of the box board):
● Kraft
● White
● Box Finish (Outside/Inside) (combinations of White and Kraft):
The following box Finish types are supported:
● White Outside / Kraft Inside
● Kraft Outside / Kraft Inside
● White Gloss Outside / Kraft Inside
● White Gloss Outside / White Inside
● White Outside / White Inside
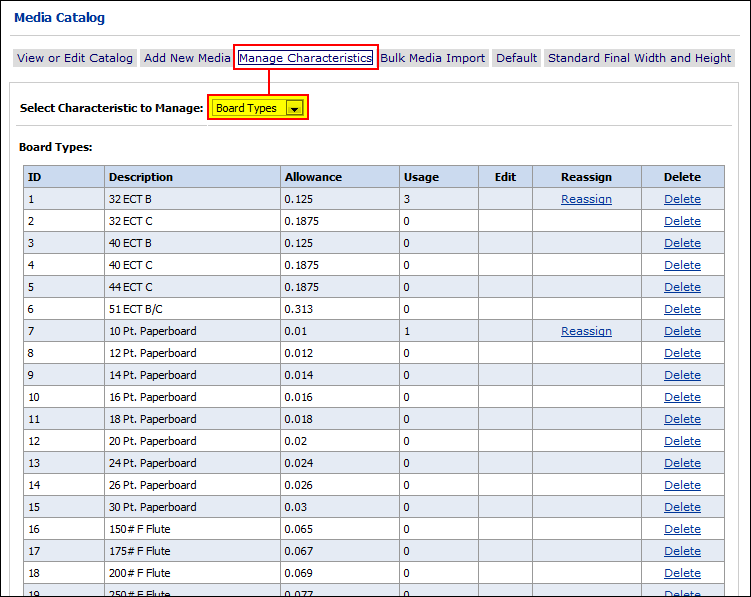
● Board Type (thickness of the box board):
The box license comes with 65 board types, which you can filter based on Board Types on the Media Catalog page:
You can create additional board types
as needed using the same procedure as for creating any Media characteristics (i.e.,
on the Media
> Manage Characteristics page).
Allowance is required to define a new board type characteristic.
The Allowance value will determine the thickness of the box.
Advanced:
Filtering Assets for Box or Commercial Print
You can choose an option to allow you to filter print service categories, Media, price sheet entries (Media, impressions, and print service categories), and ticket template options (print service categories and Media) so that only a subset of attributes relevant to a business use (Commercial print or Box) is shown.
For example, if you select the Box option, only box-specific print service categories, Media, price sheet entry options, and ticket template options will be available. Non-box-specific attributes will be hidden.
The options available in this section will vary based on the options you have licensed.
1 Go to Administration > Site Settings.
2 On the Basic Settings tab, scroll down to the Default Label(s) section.
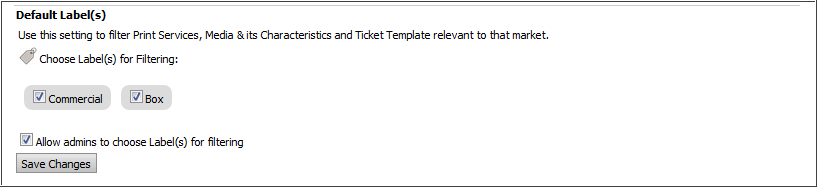
You must have at least one box checked. Thus, if you want to turn off Commercial and turn on Box, you should turn them both on first and then turn off Commercial.
Your Default Label(s) settings will remain set until you change them (i.e., logout / login does not reset the values).
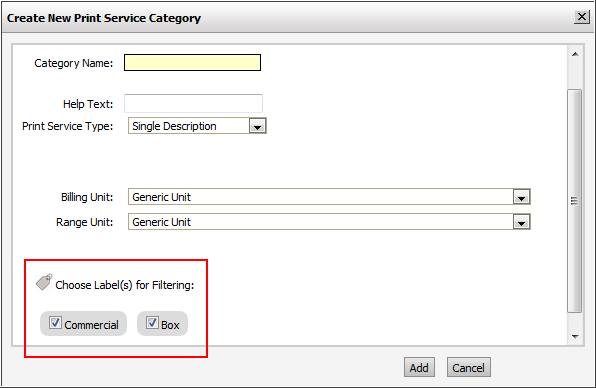
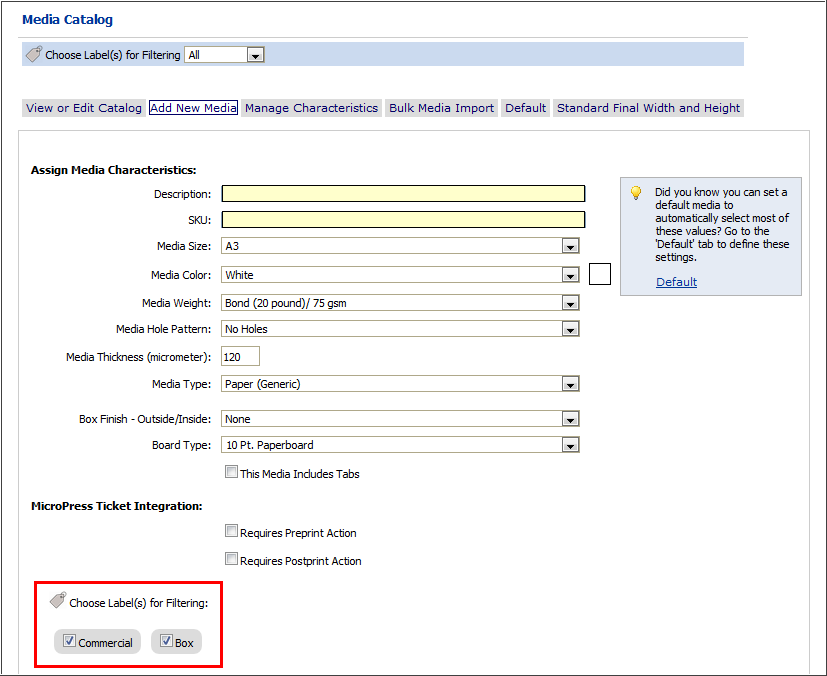
3 Configure filtering in the Choose Label(s) for Filtering field. This control lets you choose which attribute filters you want to make available (i.e., you can toggle on / off) on the print service categories, Media, price sheet entries, and ticket template pages).
● Commercial: Select this option to filter commercial print-specific print service categories, Media, price sheet entries, and ticket template attributes.
● If you enable only Commercial filtering (and leave Box unselected), no box-specific attributes will be listed.
For a complete list of default
attributes in the Commercial filter, see the attached document
Default_Shipped_Data.
For example, the Media list will exclude box-specific Media:
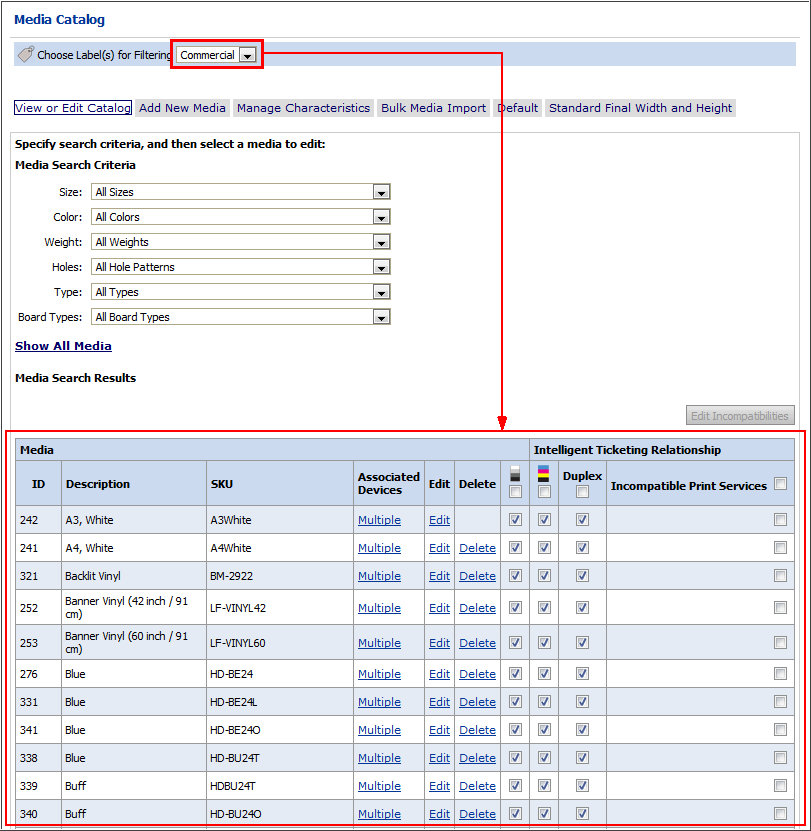
Only commercial print options are shown, and no box-specific options (e.g., Kraft, flute cardboard, etc.) are shown.
You will be able to select either the Commercial or All filter on all asset pages (e.g., print service categories, Media, etc.).
● Box: Select this option to filter box-specific print service categories, Media, price sheet entries, and ticket template attributes.
● If you enable only Box filtering (and leave Commercial unselected), only box-specific attributes will be listed.
For a complete list of default attributes in the Box filter, see the attached document Default_Shipped_Data.
For example, the Media list will include only box-specific Media:
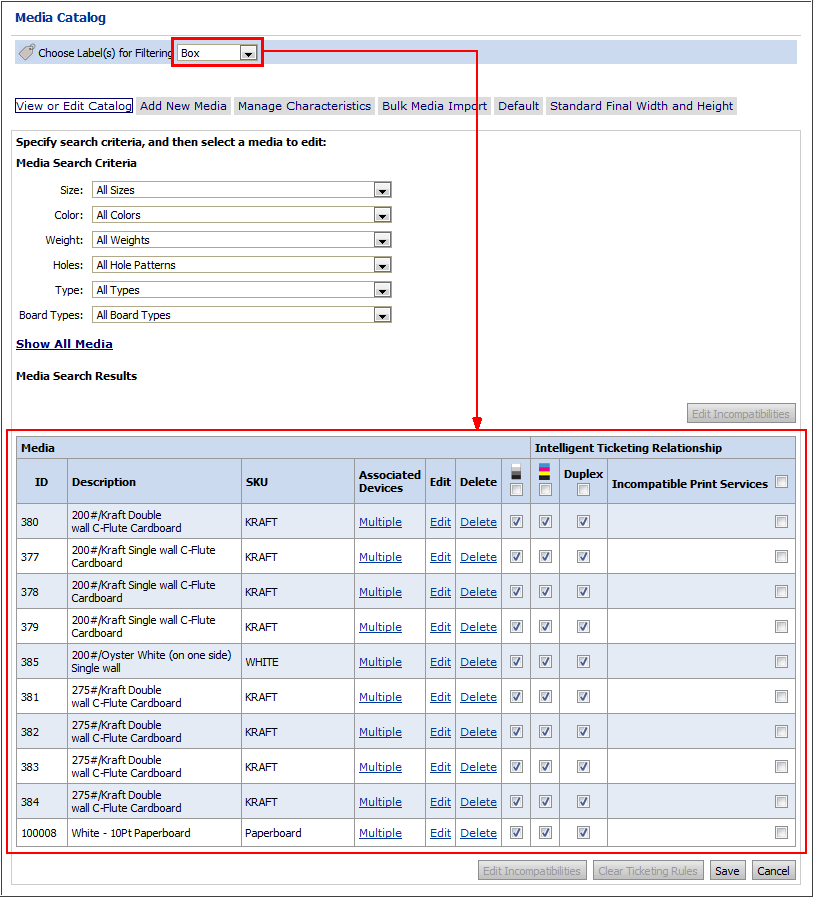
Only box-specific options (e.g., Kraft, flute cardboard, etc.) are shown.
You will be able to select either the Box or All filter on all asset pages (e.g., print service categories, Media, etc.).
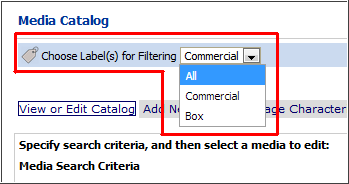
● Both: If you enable both Commercial and Box options, all attributes will be shown, and you will be able to select the All, Commercial, or Box filter on all asset pages (e.g., print service categories, Media, etc.).
● If you select both Commercial and Box, the Allow admins to choose Label(s) for filtering option will be available. Select it if you want to be able to assign any new attributes you create to either the Commercial or Box filter (or both).
This means that when you create any new Media entry or characteristic, print service category, ticket template options for print service categories and Media, or price sheet entries for Media, impressions, and print service categories you can assign it to either or both filters (as shown in the images below). The attributes will then be included in the selected filter(s).
4 Click Save Changes.